Detecting COVID-19 from X-Ray/CT Scans using AI with 98% Accuracy (Deep Learning) - Lesson #1
Mar 16, 2020
I'm currently studying Practical Deep Learning for Coders, as a part of Lesson 1, I'm writing tons of notes. But TBH, the best way to learn is do actually do.
Luckily Jeremy Howard (who teaches the course) says the same. So yesterday (15/03/2020), I went about trying to find a problem to solve.
The first lesson of Fast.ai course, teaches you about Image Classification. This can be used for many scenarios, one common problem is detecting disease from photos.
With the worlds current challenge with COVID-19, I decided to build a classifier to detect COVID-19 from xrays.
My idea came when searching Google. I found that a startup in China was already doing this is 34 hospitals successfully.
The sensitivity of chest CT was greater than that of RT-PCR (98% vs 71%)
98% vs 71%? Why are we not doing this already?
Infervision are already doing with over 2,000 images from patients over the last few months. This is deployed into 34 hospitals. This allows hospitals to check patient much faster and accurately. Again I ask, why are we not doing this in the UK?
Anyway, what they found is scanning xrays was far more accurate that checking the RNA, so following the KISS principle, I simply searched for scans of COVID-19 so proceeded to build a model.
Find a dataset
This took the longest, luckily I found a small but growing dataset from Joseph Paul Cohen PhD from Université de Montréal on GitHub.
After emailing Joseph and asking some dumb questions, I labelled the images into folders to get ready to classify them. I wrote some JavaScript to do this quickly, because my Python coding speed is slow. Here's the code:
const fs = require('fs')
const CsvReadableStream = require('csv-reader')

function string_to_slug(str) {
  str = str.replace(/^\s+|\s+$/g, '') // trim
  str = str.toLowerCase()

  // remove accents, swap ñ for n, etc
  var from = 'àáäâèéëêìíïîòóöôùúüûñç·/_,:;'
  var to = 'aaaaeeeeiiiioooouuuunc------'
  for (var i = 0, l = from.length; i < l; i++) {
    str = str.replace(new RegExp(from.charAt(i), 'g'), to.charAt(i))
  }

  str = str
    .replace(/[^a-z0-9 -]/g, '') // remove invalid chars
    .replace(/\s+/g, '-') // collapse whitespace and replace by -
    .replace(/-+/g, '-') // collapse dashes

  return str
}

const loadCsv = () =>
  new Promise((resolve) => {
    let inputStream = fs.createReadStream('./metadata.csv', 'utf8')
    const rows = []

    inputStream
      .pipe(
        new CsvReadableStream({
          parseNumbers: true,
          parseBooleans: true,
          trim: true,
        })
      )
      .on('data', function (row) {
        console.log('A row arrived: ', row)
        const [
          patientId,
          offset,
          sex,
          age,
          finding,
          survival,
          view,
          date,
          location,
          filename,
          doi,
          url,
          license,
          clinicalNotes,
          otherNotes,
        ] = row
        rows.push({
          patientId,
          offset,
          sex,
          age,
          finding,
          survival,
          view,
          date,
          location,
          filename,
          doi,
          url,
          license,
          clinicalNotes,
          otherNotes,
        })
      })
      .on('end', function (data) {
        console.log('No more rows!')
        resolve(rows)
      })
  })

const getFileNamesAsync = (dirPath) =>
  new Promise((resolve) => fs.readdir(dirPath, (err, files) => resolve(files)))

const main = async () => {
  // const images = await getFileNamesAsync('./images/');
  const records = await loadCsv()

  const labels = {}

  records.forEach((record) => {
    const { filename, finding } = record

    const slug = string_to_slug(finding)

    if (slug === 'finding') return

    labels[slug] = labels[slug] || []
    labels[slug].push(filename)

    const dsFolder = `./dataset/${slug}`
    if (!fs.existsSync(dsFolder)) {
      fs.mkdirSync(dsFolder)
    }

    const sourcePath = `./images/${filename}`
    const destinationPath = `${dsFolder}/${filename}`
    if (!fs.existsSync(destinationPath)) {
      fs.copyFile(sourcePath, destinationPath, (err) => {
        if (err) throw err
        console.log(sourcePath + ' was copied to ' + destinationPath)
      })
    }
  })

  console.log(labels)
}

main().then(process.exit)
This simply takes the metadata.csv and copies all the images into subdirectories. This makes it super easy to then use as a dataset with Fast.ai.
Building the AI
Look it's really really simple. Fast.ai has changed the game. Coders like me can build a model in an afternoon, sure it's not production ready or accurate yet, but that's simply down to a small dataset. In about 30 minutes I got to 83% accuracy on a tiny dataset.
Taking from lesson1, I trained the model, tuned the model and exported it ready for production.
Where to run the code?
My business partner and I have been using Fast.ai for a while, the best and cheapest place is Collab. It's a Google Docs like experience and it's hosted by Google, so runs on their GPUs and it's FREE!!
Yes you don't need a powerful laptop to do AI.
Okay enough talking, show me the code!
With Collab comes the issue that the backing instance (machine) you are using can constantly change, so you need to store your datasets & models in the same place everytime. Luckily on Collab, they allow you to mount to Google Drive.
Here's some code to do this:
# Mount to google drive
from google.colab import drive
drive.mount('/content/gdrive', force_remount=True)
root_dir = "/content/gdrive/My Drive/"
base_dir = root_dir + 'fastai-v3/covid19/data'
Once mounted, I uploaded the folders of images I created on my machine to my Google Drive under fastai-v3/covid19/data as seen above:
This means my workbook can read these same images now.
Next, we define the list of classes and check the images:
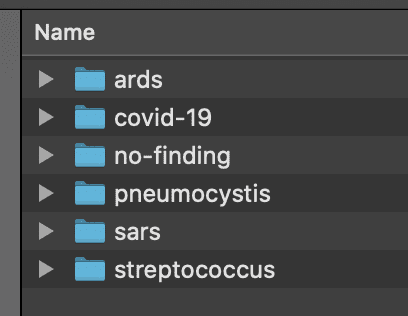
classes = ['pneumocystis','streptococcus','nofinding','covid19','ards','sars']
for c in classes:
    print(c)
    verify_images(path/c, delete=True, max_size=500)
This makes sure the images are safe to use (actually readable).
Creating the training and validation set
data = ImageDataBunch.from_folder(path, train=".", valid_pct=0.2,
        ds_tfms=get_transforms(), size=224, num_workers=4, bs=bs).normalize(imagenet_stats)
This is a helpful factory function from Fast.ai, that splits the images into training and validation set. Using 20% for validating and 80% for training. Next thing this does is normalize the images, this really helps the neural network to learn.
If you imagine some pixels may look the same but have different RGB values, thus this makes sure they have a mean of 1 or a stdev of 0.
Let's see what our images look like
Fast.ai has tons of these helpful methods, here's our test batch:
data.show_batch(rows=3, figsize=(7,6))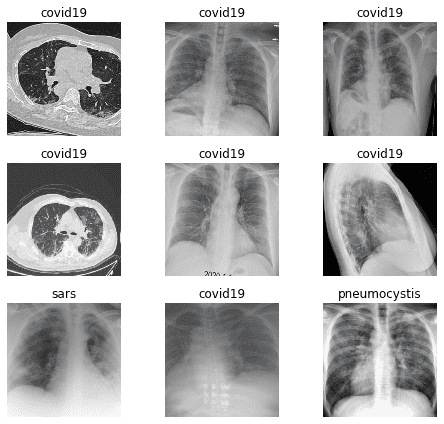
Creating the model
Fast.ai uses Transfer Learning, this is a faster and more accurate way to build Image Classification models. The most common is ResNet34, due to it's balance of speed and accuracy. 34 means the number of layers. Also the other common, pretrained model is a ResNet50.
In most cases, you can simply use a ResNet34, adjust slightly and hit 99% accuracy. To put this into perspective, only 80% was possible a few years ago with masses of compute and learning time. This model was training in minutes.
learn = cnn_learner(data, models.resnet34, metrics=error_rate)This downloads the pretrained weights, ready to learn about your dataset.
Training the model the first time
learn.fit_one_cycle(6)Due to the small dataset we had to change the batch size from 64 to 16. But the results are pretty poor:
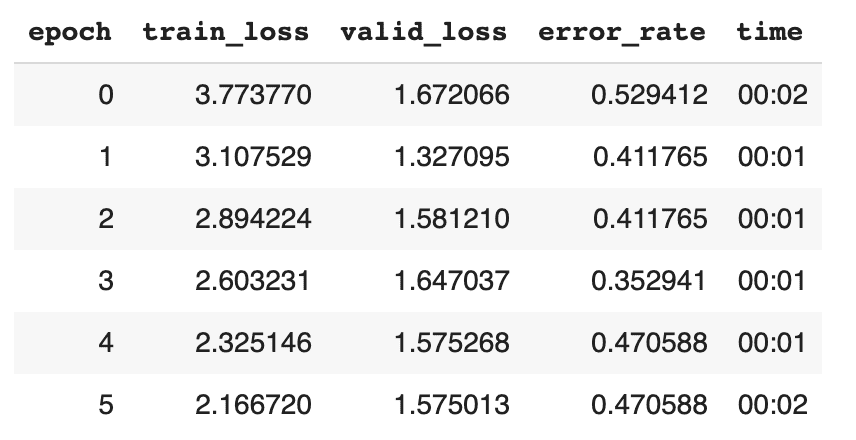
47% error rate? Oh great
I've tried out this same code on Bears, Cars and other more obvious images, it goes nearly straight to 99%. So it's very much down to the dataset and the problem domain. But there is more we can try first...
Finding the right learning rate
To build an accurate model takes a lot of trial and error, but the most important factor is the learning rate. Fast.ai allows you to set this as a range to try.
The learning rate sets how quickly am I updating the parameters in my model. Going too fast will cause the model to overfit and going too slow will mean you'll be training your model for 1000s of years haha.
Here's the code and process to find the optimum learning rate for ResNet34.
learn.save('stage-1') # save your current model
learn.unfreeze() # unfreeze the one in memory, so it can be modified/analysed
learn.lr_find() # analyse the learning rates, this takes a while
learn.recorder.plot() # plot the results
Which will look something like this:
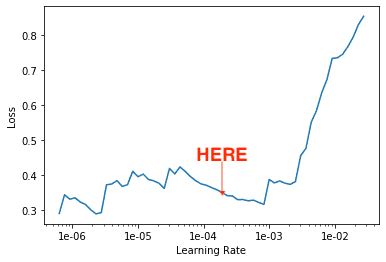
To find the best learning rate, you want the area of the graph where the line goes down at the steepest rate. Which in this case is somewhere between 1e-04 and 1e-03.
So we run again, but this time with a learning rate and many more cycles, each cycle uses the previous weights, meaning it gets more accurate:
learn.fit_one_cycle(10, max_lr=slice(1e-04,1e-03))83% accuracy! 🎉
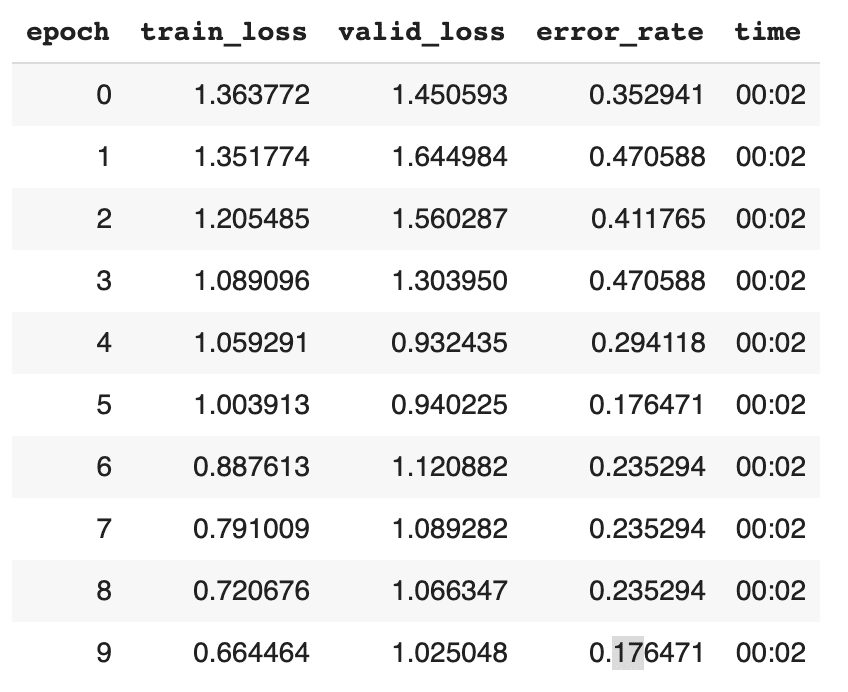

This cannot really be trusted due to the small number of samples, but it's not bad for 30 minutes of playing around. As the datasets grow around the world, I'll develop the model further and put it out for free online. So people can simply upload the scans and get an answer.
It's important we use our abilities to help the world.
In the next post, I'll put this model into production and share a link for you all to try it out.
Thanks for reading, Ash.